Saturday 24 July 2010

Fork!

I managed to complete my fork jig and then go and use it. As I was making the fork, the fork blades looked comically short, but it turns out it was the right length after all


Happy with the progress and excited to finally ride the bike before sanding and powdercoating, I thought I'd quickly throw it together...  after a lot of fiddling with bleeding the brake, chasing the BB threads (again), and finding out that the crown race seat on the fork is WAY too big, I had an almost complete bike.


Except the crown race seat needs turning down:


Work on the bike has paused over the weekend following the Commuter Cycles Black Market. The lathe area is full of bikes and crap. At least the Black Market was a success.


The market was followed by some crazy CX movies

Sunday 18 July 2010

Tubes

Once again, it's been a while since my last post, but this time I've got a great excuse. My little compact digital camera has died. So I'll write about something that I photographed a while ago. People often ask what I made this bike from. With the paint on it looked like I might have just cut a few old bikes up and stuck them together. The idea with this bike was to make something tough for polo and something that used cheap tubes (in case it turned out I wasn't very good at brazing and making bikes).

You might notice that the two photos don't actually match. The original design had the same diameter top and downtube which would look a bit odd. When it came time to mitre the frame, I made a last minute change to drop the BB a lot more than first planned. I had also just collected some nice old mountain-bike frames from the rubbish pile at Ceres. So that's when the Mongoose downtube showed up. It's made from "custom drawn" Tange tubing at 34.9 x 0.9, possibly butted. Other variations from the original photo are the chainstays are now Columbus Zona (with MTB S-bend) instead of Thron after I mashed a chainstay when trying to custom S-bend it. The seatstays are the same bits of steel, but are in fact from Dedaccai, not Columbus. I'm using the Pacenti crown to make a new fork for my touring bike now. I'll be using a Long Shen LC41 crown, as used on a Surly Cross Check. The fork blades are Thron

So... complete tubeset is: Plaingauge CroMo, Custom externally butted headtube from plaingauge stock, Columbus Thron, Columbus Zona, Recycled Tange "Custom Drawn", Dedaccai

In other news, I've completed a fork jig enough to make the fork for my polo bike! Not long to go now.

Friday 18 June 2010

Boil, Boil, Toil & Disc Tabs

It's been a while since my last post, and the frame is almost complete. 
Since the last post I've:
  1. Boiled the  frame for a few hours in water to loosen up the flux (which is water soluble)
  2. Brazed in the brake- and chainstay-bridges
  3. Brazed on the disc brake tab (and a brake brace with integrated disc guard mounts)

Tristram (huntsman cycles) and I spent a day trying to boil the excess flux off our frames and had a bit of success, with the flux easily brushing or sanding off afterwards. My super friendly, elderly Italian neighbour was spending the day in his shed too: pressing grapes to make his yearly batch of wine. He said the grapes weren't very good this year, the juice was too watery and not at all sticky like the good stuff. So, to reminisce, he poured me and Tris a plastic cup of the good stuff-- his sweet, potent Muscatel.

Polo frame in my great grandmother's old stewing pot. The aluminium's looking so corroded and health-scary that my mum won't even let the dogs use it as a water bowl any more.


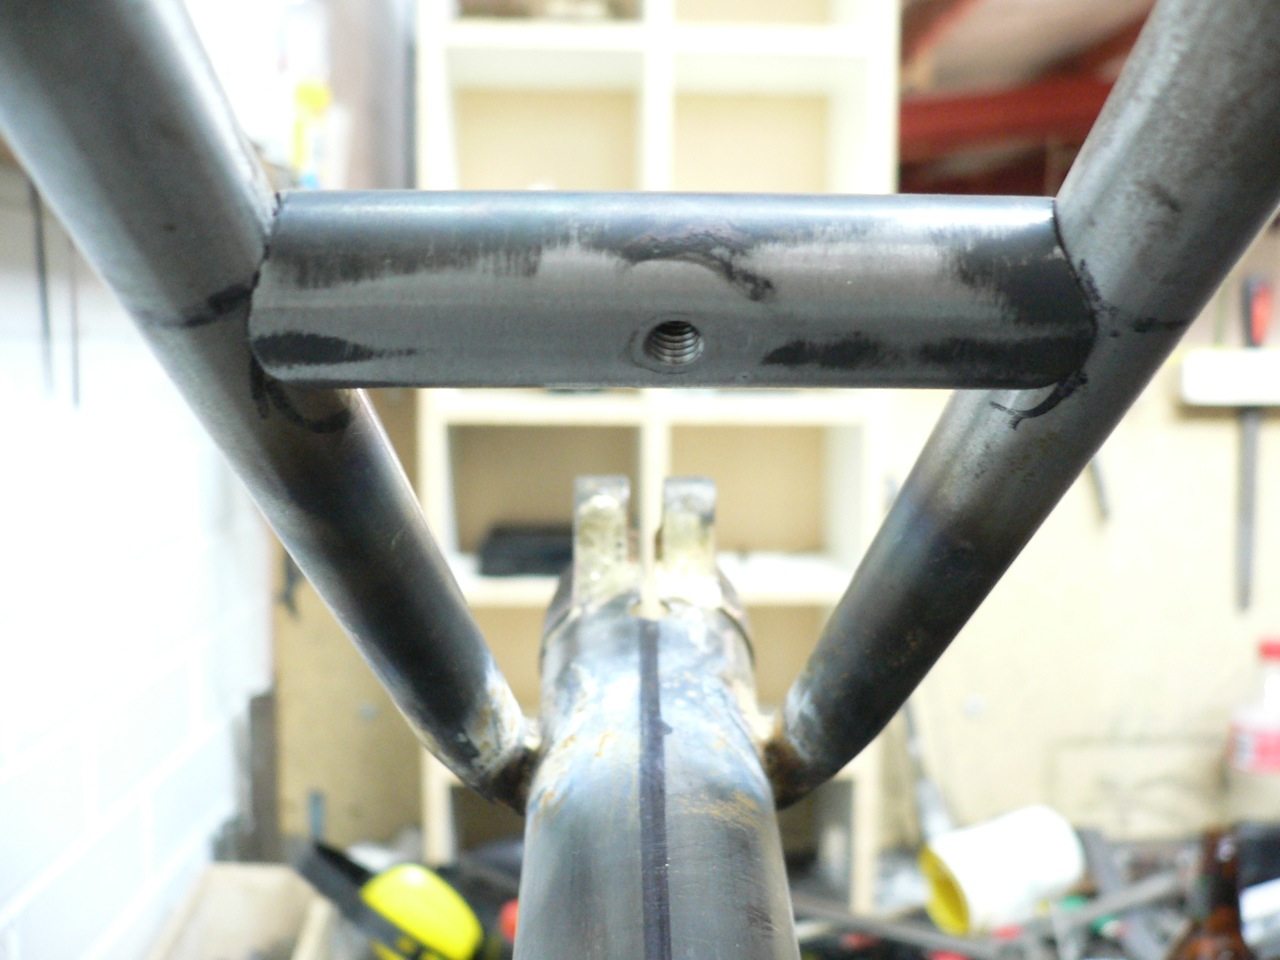
After the cleanup, I added the bridges. Brake bridge has a flush mounted threaded eyelet in case fenders are one day fitted for a single speed commuter build. Chainstay bridge was a nightmare to fit.


Chainstay bridge prior to brazing

 
Brake bridge prior to brazing, looking along seat tube

Brazing on the disc tab was lots of fun really. I had to make up a jig according to the IS2000 standard. I used some 9mm plate steel I had left over from my days working at PBR. Should really take a photo of the jig one day. It's super beefy. I thinned out the little web between the two slots which made it look pretty hot.
 
Disc tab brazed on, brake trial fit. Brace still to come in photo

I've also been getting some help around the place from the amazing mister jack. Doesn't he look dapper with his yellow belt, shifter and screwdriver
Help-o-rama

I also managed to get a secret spy shot of Huntsman Cycles' new bike before it's even been painted. Here's a sneak peek:
The photo was taken with my rather rubbish camera phone. It looks like i might have cleaned the usual smudges from the lens before i took this one. Notice the nice fillet brazing on this touring MTB. I think he's going to get it powder-coated Orange X15, hot! The test will be cycling down tassie's Western Explorer in a month or two.

Monday 22 March 2010

Making It All Fit

It seems that things have slowed down on this project lately, I seem to have been without seat-stays for a long time. I think it's just the amount of fiddly work involved before fitting the seat-stays (getting the seat-stay top-eyes done, the rear end aligned, chain-stays crimped for chainring and disc rotor clearance, seat-stays bent for tyre clearance). Here's what the frame looks like with the rear wheel in place fitted with a 26x1.5" slick tyre (the seat-stay is just sitting in place for now). The tiny frame makes the wheel look pretty big. 

As for stay clearance, there's a little bit of room to allow for a buckled wheel at the chain-stay (left), but the seat-stays will need a little tweaking (right). 

I'm pretty happy with the top-eye though. This photo reminds me that I really should soak off the flux so this joint doesn't look so hideous. 


You may have spotted it above, but, I crimped the chain-stay for a disc rotor...  That's right, it's getting disc brakes! I managed to squeeze in a tiny 140mm disc with just a little bit of chain-stay crimping. 


Monday 8 March 2010

Fillets & Trial Fitting

Today was a public holiday, a perfect day to work on a project. Huw and Tris thought the same thing and came in to Commuter Cycles for a bit of Men's Shed time. I got the brazing done pretty quickly and spent a lot of time filing the joints smooth. I also test fitted the cranks to check for chain-stay clearance (I will need to crimp the right chain-stay for chainring clearance) and fitted a hub and checked rear end alignment. With the rear end out of alignment and the chain-stay needing to be crimped, it might be a little longer yet before I can lock in the rear end with seat-stays and some bridges.


I can't get over how chunky this thing looks, especially with the Shimano cranks fitted, the frame looks stocky and kinda tough.


With a disc hub fitted, it's possible to estimate how much the left stay would need to be crimped to fit a disc in. That'd be some funky tube manipulation. As it is, the stays have S-bends for tyre clearance and crank-arm clearance as they splay out rather dramatically to fit a reasonably wide MTB hub (135 mm wide) over their super short length (385 mm centre to centre). At least a standard MTB wheel will fit, unlike the Fleet Velo Joust, a disc brake can be a challenge for my next bike.


Saturday 27 February 2010

Tacked


After making a mess of the second bend on my Columbus Thron chain-stays, I ordered some Columbus Zona MTB S-bend chain-stays from Ceeway. Ceeway didn't have a picture or dimensions or anything for their Zona S-bend stays even though they're offered in 3 bends (MTB, road & cyclocross), so I blindly bought the MTB bend. Turns out they look really nice and are just what I wanted.

An unadulterated Thron stay is at the top, and the curvy Zonas are below.

To fit a MTB hub between the short stays meant they have to be splayed out quite a bit, this meant removing the pretty little web on the BB Shell so the sockets could be bent and manipulated out.


Then just a bit more fiddling with the stays to get the dropouts in.


The day before I flew to Tassie for an 11 day bike tour, I managed to get the polo frame tacked together. Tris has set up his frame-building stuff out the back of Commuter Cycles so I had to get the jig and all the bits across to Brunswick. It turns out the jig's quite big and only just squeezes into a taxi. Working from 7:30 - 9:00 Tris helped me flux the joins and then stood patiently by as I got the tubes up to temperature and dabbed on some bronze.


When it had cooled enough, the moment of truth arrived and it was removed from the jig. It was a fantastic feeling to pull my first frame from the jig, knowing that all the tedious setup and mitring was over and a new bike was only a bit of brazing away. I trial fitted a rear wheel, complete with 26x1.5" tyre but one of the tacks on the BB shell didn't hold. I wired the frame together to close up the gap and went to re-tack but got carried away and ended up completing the first layer of fillet braze on the BB junction. 


The frame in its finished shape (obviously with seat-stays to come):


It's surprisingly light considering the straight gauge tubing used (It wouldn't be easy to source butted tubes in such short lengths anyway) and the large tube diameters. The frame is pretty small though, so even though the tubes are relatively heavy per metre, there aren't that many metres of tubing used.

Sunday 31 January 2010

A Better Thing

The first ever custom fabricated bunyip bike, the {unnamed bike} is getting closer to completion! The front triangle is now all mitred, the dropouts are spaced correctly and things are nicely aligned.


Since this is a new blog and there's been plenty of work before this started, I'll explain it's genesis.
The geometry is based on 9 months of playing polo on my current bike, "Lil' Sensenmann". Sensenmann was an exercise in making a short wheelbase 26" bike from readily available parts. Namely, an old 'waterpipe' juvenile road bike (to fit 24" wheelchair wheels), a nice Raleigh cromo MTB fork and a few bits brazed on for frame strength and braking performance.


The new bike as a few tweaks: The main change is to the steering, with a sensible headtube angle and a more respectable amount of trail. There's more BB drop to get closer to the ball and bring the seat down in relation to the handlebar. The chainstays are shorter (with track-ends so the wheel can still be installed). The seat tube is still very relaxed to put the seat back over the rear axle. Turns out the front centre on Sensenmann is just long enough that I don't have issues with toe overlap despite appearing too short.